
Hi Chuck again,
In tandem with a previous posting on how to “Care and Maintenance of Your Stapler” I thought I’d write a few lines on the care of your Brad Nailer.

I’d like to reiterate that running your air tool at the correct air pressure and lubricating the tool with air tool oilis good basic practice (If you do not have an inline oiler just add a couple of drops via the airline fitting on the tool) Once connected to the airline the pressure will dissipate the oil around the tool via Trigger Valve/Cylinder/Piston Driver Assy and Head Valve).
Air pressure should be set at approx. 90psi (6.21 bar) and try and keep the air as dry as possible – good practice is to drain the compressor cylinder daily.
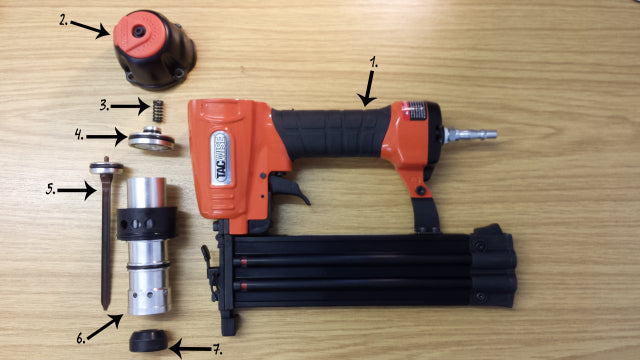
The Anatomy of a Brad Nailer
The above image lists the basic parts of the Brad Nailer as follows:
- Main Nailer Body – Housing the operating Trigger Valve, Cylinder (6) Piston Driver Assy (5) and Bumper (7)
- Head – This part is normally attached with 4 bolts but can be also threaded into the Main Body. The head is also the housing for the Head Valve.
- Head Valve Spring – Retains Head Valve against Cylinder after operating cycle.
- Head Valve – Seals against the Cylinder prior to operation cycle.
- Piston Driver Assy – The main thrust of the tool……..(Excuse the phrase) Driving the Brad Nail from the Feed Magazine into the work surface.
- Cylinder – The housing that the Piston Driver Assy cycles within.
- Bumper – At the base of the Cylinder absorbing the impact from the Piston Driver Assy at the base of its cycle.
When servicing this type of tool or any tool for that matter I like to operate on a nice clean and tidy surface…..Don’t I sound like a Neurosurgeon?
A tidy surface reduces the risk of losing any small item parts…….it always amazes me how that little tiny spring always flys of into the workshop abyss to be never found again….
Clean and inspect all parts especially the condition of the Damper and O Rings.
Ensure the Head Valve operates smoothly against the Spring without any sticking movements.
When inspecting the Piston Driver Assy check the contact point with the Brad Nail is flat and not rounded. This may over time become rounded causing the driver to ride over the top of the Brad Nail and leave the fastener proud of the work surface. It can be ground flat again with a grinder but be careful not to take too much off. Otherwise, replace the complete assembly.
Finally, although not listed, always inspect the magazine and Feed Assy – Feeder Shoe and Spring should be in good condition and be able to move freely.
Although there are many different Brad Nailguns available the design will be around the format discussed.

So there you have it! the 7 Components of a Brad Nailer along with the steps to care for and maintain your tool.
Whatever you do, don’t overlook your air tool oil- ‘the font of air tool life’!
We highly recommend Drapers which is available at the best price with the best rating on our Amazon Affiliate Scheme. NB for every sale of this via our link below pays us a minute amount of commission, of which given this useful article to help make your Brad Nailer live longer I’m sure you will agree is deserved!
Draper Airtool Oil
©
Take care for now and keep up with the good work 😀

Join the Stapling and Nailing family with our Newsletter for great deals and high quality information, it only takes a few moments…