If you’re looking to buy a new miter saw, then a good place to start is figuring out exactly how to CHOOSE a miter saw. This can vary, depending on the TYPES OF CUTS it will be used for.
There are 2 different main sizes, and many different features available with each size. For this guide, we will be covering 10″ and 12″ compound miter saws.
Cut capacities vary quite a bit depending on the size of the blade, and how the saw is designed. For instance, you’ll cut bigger crown molding when using a belt-driven saw, vs a direct drive.
Cost also plays a big role in features and cut capacities. You’ll be paying bigger bucks for a miter saw that has more features and cuts wider material.
How To Choose A Miter Saw Based On Features
The various features found on these saws are really what makes them stand apart. Moreso than just the size and manufacturer. I’ll go over some of the main features that differentiate the different models. You’ll see how these features are helpful, and who they are most beneficial for.
Sliding Miter Saw
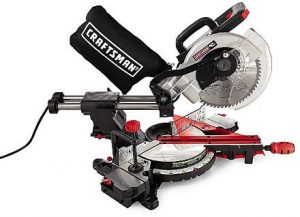
The sliding feature found on various models does a few things for the capabilities of the saw. It adds several inches to the crosscut capacity for one. An example would be the Craftsman non-sliding 10″ miter saw having a crosscut capacity of 5-1/2″ inches. Compare that to the Craftsman Sliding 10″ miter saw, with a full 12″ crosscut capacity. That’s a big difference.
However, this difference comes with a price. Literally, it costs more. But in addition to the higher price tag, it also adds weight. The sliding miter saws are going to be heavier tools as they have additional components.
Also, some people find that the more moving parts you have, the less solid the tool feels. I can relate to this. My sliding miter saw just doesn’t quite feel the same as a non-sliding model. But I don’t notice it enough to make a difference. And I don’t believe it actually hurts the performance of the saw.
The exception here would be if you find yourself a cheap, poorly reviewed sliding saw. With these, you’ll likely find it has inaccurate cutting and not-very-smooth sliding.
Who’s it for?
If you’re doing basic miter saw work, the sliding feature is not really needed. What I mean there is basically cuts that don’t need to be very wide. So if you’re a DIYer or a professional, who will basically be cutting 2x4s, hardwood flooring, basic trim molding, stuff like that. You don’t really need the sliding miter saw.
But if you do a lot of decking, bigger framing (cutting floor joists), large baseboard and crown molding, cabinets, shelving, woodworking, etc. These types of projects really do better with higher crosscutting capacities, like what you’ll get with the sliding miter saws.
Dual-Bevel Miter Saw
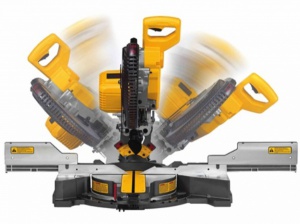 The dual bevel feature found on many models is a great way to simplify and speed up the process when doing crown molding and custom furniture. I find that having only a single-bevel action saw is somewhat limiting when doing compound cuts. For me, it makes the cut more complicated than it should be.
When you have to flip the board around to cut the opposite way (due to only a single bevel saw), it can get confusing. Not only are you working backward compared to the other side of the cut. You also have to pay attention to what side of the line the blade touches down on.
So dual bevel just makes this simpler by allowing you to keep the orientation of the board the same way for each cut, no matter if you’re cutting the left or the right end of the board.
Who’s it for?
The dual bevel feature is not necessary for doing crown molding. But finish carpenters or DIYers who do a lot of crown molding will definitely get the most benefit from this feature.
Also, if you’re building furniture and plan on making cool miter joints and custom 7 sided bases and whatnot, then the dual-bevel feature is a good idea for you as well.
Laser Guide Positioning
 Lasers are being put on a lot of miter saws nowadays. And if they don’t come with one, many times the manufacturer creates an optional attachment laser that you can buy. And new models that Dewalt has come out with now have a LED positioning system, which I cover in detail here. For the sake of this article, I’m lumping this LED system with the Laser system on most other saws, as they basically serve the same purpose.
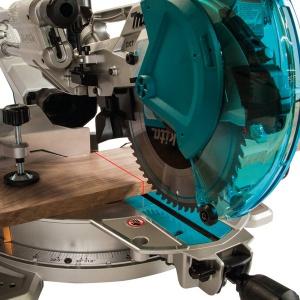
The lighting system is used for lining up your cut and is a great way to cut more efficiently. That means you spend less time for set up on the saw. These systems are really handy because you can simply make a small mark where you want the cut to be, then line that mark up right at the laser. Make the cut, and your off to the next board.
Miter saws that do not have this feature require a bit slower process. You’ll have to mark a line across the board, then when you put the board against the fence you’ll have to lower the blade down and touch the board. Slide the board until the edge of the blade is at the line. So one hand is holding the blade down, the other is shifting the board. This is very normal and usually the process I use. However, it is slower than lining up to a laser line.
The downside to these systems is that they are not perfect. They work great for framing, decking, hardwood flooring, and making rough cuts. But if you’re doing final cuts for furniture, or trim molding, you’re going to require perfection.
That means you don’t allow for even 1/32nd off, as that could make a gap where you don’t want a gap. So in this case, you’ll still end up manually lining the blade up to the cut mark.
Who’s it for?
As a woodworker, I can attest the laser guide being very handy. I make a lot of rough cuts on the miter saw. Usually, my final cuts are done on the table saw. But rough cuts are not required to be perfect. So the laser guide gets me close enough and saves me time.
And like I mentioned above, if you’re doing a lot of framing, decking, and hardwood flooring, the laser guide systems are really handy. These projects don’t require that degree of perfection. So typical DIYers and professionals will benefit the most.
How To Choose A Miter Saw Based On Size
So each size of miter saw basically offer the same features. However, anything you get in a 12″ model simply has more cutting capacities. This is not always the case, as a 12″non-sliding miter saw has less crosscutting reach than a 10″ sliding miter saw.
When deciding how to choose a miter saw, you’re probably considering between either a 10″ or a 12″. So I’ll lay out the reasons you would want to spring for the more expensive 12″ model (which also use more expensive blades), over the 10″.
10″ miter saws can handle most jobs, but they simply can’t give you the ranges a good 12″ saw can, so here’s when this makes a difference.
- If you prefer a non-sliding miter saw, but need to crosscut a lot of 6″ or even 8″ dimensional lumber, you will need a 12″ model to do that.
- If you cut baseboard that’s 6″ or taller, vertically against the fence, you’ll probably need a 12″ miter saw to do that.
- If you need to make crosscuts 14″ wide, or even 16″, you’ll need a 12″ sliding model to accomplish that.
Putting It All Together
So, how to choose a miter saw. Well, which features sound good to you? Which ones are you willing to pay extra for? That’s kind of the choice you have to make on your own.
Once you get this part figured out, just read through some of our reviews here on The Power Tool Website to compare the smaller, less significant features. This way you can get a feel for what saw really speaks your language.
Here are some links to help you get started.
For a basic use miter saw for doing some DIY projects like hardwood flooring, and some basic framing and trim molding, check out the Ryobi TS1345L.
If you’re getting into woodworking and want more crosscutting capacity, but don’t really need to cut large baseboard or crown molding, you may like the Craftsman 21237.
If you really just need a good job site saw that is compact and fairly lightweight, that can cut 2x10s, check out the Makita LS1019L.
If you want large cutting capacities, wide crosscutting, huge miters, and tall baseboard, see the Dewalt DWS780.
Be sure to sign up below for free tips and woodworking techniques, projects and plans sent straight to your inbox.
Related:
How To Choose A Table Saw
Woodworking For Beginners
Miter Saw Projects