The miter saw is a powerful and versatile tool. It’s a must-have for any do-it-yourselfer. You’ll use a good miter saw for doing framework, door casings, furniture building, crown molding, baseboards, and more.
Note – If you’re already comfortable using your miter saw and need to improve your miter cutting accuracy, see How To Cut Perfect Miters.
If you need to learn how to use your miter saw, follow this guide and you’ll see just how easy it is to make any of the 4 types of miter saw cuts:
- Crosscut
- Miter cut
- Bevel cut
- Compound cut
How To Use A Miter Saw For Beginners and DIYers
First thing you want when prepping to use your miter saw is the proper safety gear. No one wants to be injured, so everyone should use the right gear to help reduce your chances of getting hurt. With the miter saw, this includes safety glasses, earplugs, and for some types of material (like MDF), you may want to use a face mask to keep from breathing in too much fine dust.
Now depending on the type of cut you’ll be making, you may need to make an adjustment to the miter gauge, or the bevel gauge, or both (for compound cuts). This adjustment is set by releasing the adjustment knob and either rotating the cut bed for a miter cut, or tilting the saw with a bevel, or both for compound. See diagram here to determine what cut you’ll need to make:
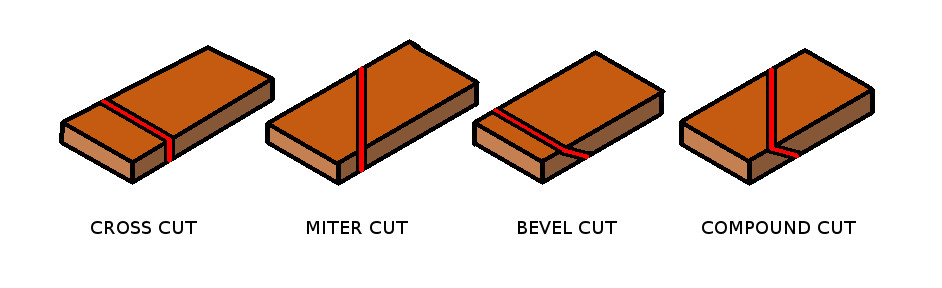
The Cross Cut
This is a 90 degree cut across the grain of the board. This is done with the saw in the upright, 0-degree position, on both the bevel and the miter gauges. This type of cut is used for shortening a board down to size and leaving the edge at a perfect 90 degrees, in both planes, to the length of the board.
This is a common cut when building furniture, framing up a wall, or cutting a rough board down to size to make it easier to work with, before doing finish cuts.
The Miter Cut
This is an angled cut on the face of the board, but on the edge, it still cuts through at 90 degrees. See the diagram above. This, for example, would be used when cutting a door casing at the top corners. This cut angle is created by adjusting the miter gauge in front of the saw, from side to side. Most miter saws can adjust from 0 degrees, up to 45 degrees or slightly over, either to the left or to the right.
The Bevel Cut
This is essentially a ‘leaning cut’. The blade will lean left or right, and cut through the wood to create an angle cut along the edge of the board, while the cut through the face is still 90 degrees. See the image above.
This type of cut would be used for doing baseboards around a corner of a wall, an outside corner or inside corner. Depending on which one, you would either adjust the bevel from left leaning to right-leaning, or in case you have a single bevel saw, you would flip the board around to make this change.
The Compound Cut
This is simply a combination of both bevel and miter cuts. You would adjust your miter angle and bevel angle, lock them both in place, and make the cut. This would describe the 4th image on the diagram above. This is common in crown molding when the piece is installed at an angle and still has to join flush with the adjacent piece at corners of the wall. This can be complicated to figure out, so most saws have positive stops for the blade at common angles used in compound miter cuts for crown molding. Make sure you understand these angles well before doing a crown molding job.
How To Use A Miter Saw – The Action
Here’s a quick youtube video showing the basics:
So you’ve determined what type of cut you need to make. You’ve made your measurements, and you’ve drawn a line on the board. A trick I use is to draw a small X on the side of the line that will be the cut-off (scrap) piece of remaining wood. This is helpful because it will determine which side of the line your place the thickness of the blade (the kerf).
Measure Twice, Cut Once
So I measure my cut distance from the left end of the board, draw a fine line at the correct distance, then I’ll put a small X just right of the line. Then I’ll line up the left side of the blade to the line I drew on the board. This puts the kerf of the blade right over the X. This way I don’t cut into and shorten the final piece. To line this up I pull the blade down (without it running) and touch the board slightly. From there I move the board left or right to get it aligned.
Now It’s Time For The Cut
Once this is lined up, I then hold the left side of the board with my left hand, and I use my right hand to depress the safety mechanism on the handle, and I pull the blade trigger. This starts the saw, and I do this with the saw in the full upright position. Do not start the saw with the blade touching the wood.
And The Blade Does All The Work
Now I pull the blade down, while it’s running at full speed, and I slowly push it through the wood. This should not take much effort at all. If you have to push hard, then you probably have a dull blade or are getting hung up in a hard knot in the wood. If you find that your blade is dull, then read how to change a miter saw blade.
For a more detailed read on this particular safety topic, check out this article from woodmagazine.com.
Now Check Your Cut
Once the blade is completely through the wood, release the trigger, holding the blade all the way down until it stops. Then raise the blade and the cut is complete.
That’s it, folks. That’s how to use a miter saw, from start to finish. We covered the safety gear required, the types of cuts you can make, and the action of making the cut. If you have any questions or comments, please comment below and I’ll be happy to respond. Have a great day and good luck on your project!
Related Articles
How To Make Perfect Miter Cuts
How To Build A Table Saw Miter Sled
How to Change A Miter Saw Blade
Set Up Your Miter Saw For Perfect Cuts
How To Build A Mitered Picture Frame